Libraries are one of the cool new things about Microsoft Windows 7. Unfortunately, Microsoft hasn’t included any administrative tools for the handling of them so system administrators can’t easily configure or create them using logon scripts. In addition, at the moment there are no Group Policy settings (or Preferences) that can let admins set up libraries. Hopefully these features will be added in the future, but until then there are still a couple ways to customize and deploy custom libraries. Continue on for a review of the most promising options and also grab a couple of our downloads to assist you…
[Note: Download links are at the end of the article]
First of all, I wanted to explain that a library file is really just a system file with a .library-ms file extension (similar to how shortcuts are really just .lnk files). They contain in XML format the properties of the library and also what folders are to be included in the library. They can be placed anywhere, but the default location is at %userprofile%AppDataRoamingMicrosoftWindowsLibraries. Therefore, Microsoft’s official method of creating a custom library is to create or edit a Library Description (*.library-ms) file directly. Fortunately, there is also the IShellLibrary Interface that contains a number of methods for playing with libraries. If you look around, there are a few places where Microsoft provides sample code that uses this interface, and I’ve compiled a couple of them and made them available for download (allowed via the MSDN Code Gallery Licenses). It’s a bit of a step backwards compared to Group Policy, but at the very least the utilities allow you to work with libraries from the command line, batch files, or scripts. Let’s now go over these options in some more detail.
Option 1: Create or Edit a Library Description File Directly
I won’t go into the details of editing a library description file directly, but Microsoft explains the schema here. It would probably be easier to create or modify a library file using the Manage Locations dialog box in Windows Explorer. Once you have the library file you want, you have a couple of options for deployment:
- Using a startup script or Group Policy Preferences to copy the library over to the Default User profile of your user workstations. The downside to this is that it would only affect new user profiles created when users log in for the first time.
- Using a logon script or Group Policy Preferences to copy the library over to your users’ Libraries folder (or another location). A much better choice in my opionion compared to option 1, but has the downside that you cannot modify an existing library without overwriting any customized settings.
- If you are taking advantage of Roaming Profiles, you could place the library file in their profile on the server and when they log in it should pull it over. This would also work if you’ve redirected users’ Appdata folders to a network share. This method has the same limitation as option 2.
Click here to learn how to customize default user profiles in Windows 7
Option 2: Use Windows Library Customization Utilities
As was already mentioned, Microsoft has released a bunch of code samples for developers to be able to work with libraries. We’ve already grabbed two of their sample projects and compiled them for you to use, saving you the trouble and also making sure you are using the correct code versions due to some requiring DLLs, missing certain features, etc. Both of these utilities allow you to create libraries, add or remove folders to or from existing libraries, set the default save folder, etc. There are some minor feature differences that may make you use one over the other, so you’ll want to check them both out and see which one works best for you.
The first one is the Shell Library Command Line (ShLib.exe), which is a command-line console application for the IShellLibrary interface. The nicest thing about this utility is that it allows you to create libraries outside of the default library location by specifying a path, something that the other utility cannot do. The biggest issue with shlib.exe is that it is less polished than you would like and the command line syntax is hard to figure out, even with the built-in help references. Because of that we will post sample lines so you can get an idea of how to use it to perform the most commonly wanted functions.
Main ShLib.exe commands 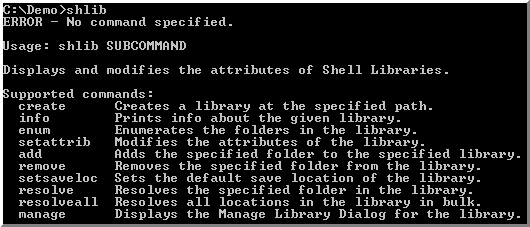
Note that the .library-ms extension is optional only for the "create" command; all other commands must include the file extension.Create "Recipes" Library: shlib create "%userprofile%AppDataRoamingMicrosoftWindowsLibrariesRecipes.library-ms"
Add Folder to Library: shlib add "%userprofile%AppDataRoamingMicrosoftWindowsLibrariesRecipes.library-ms" "C:DemoBaking Recipes"
Delete Folder from Library: shlib remove "%userprofile%AppDataRoamingMicrosoftWindowsLibrariesRecipes.library-ms" "C:DemoBaking Recipes"
Set Default Save Location: shlib setsaveloc "%userprofile%AppDataRoamingMicrosoftWindowsLibrariesRecipes.library-ms" "C:DemoPastry Recipes"
The default save location must be one of the folders already included in the library. This is the folder that Explorer and other applications will use when saving items into the library. Since libraries can be shared with other users, each library has a "private" and a "public" save location, which take effect for the owner of the library, and other users, respectively. Since the command above does not specify private or public (though you can), it will detect which save location to set based on the current user and the owner of the library.Delete Library (just delete the file): del "%userprofile%AppDataRoamingMicrosoftWindowsLibrariesRecipes.library-ms"
If you need further help, check out the sample Library_Demo.bat batch file included with the utility.
The second utility we’ve made available is the Shell Libraries Utility (SLUtil.exe). This is easier to use than ShLib.exe, but we haven’t found a way to make it create or modify libraries outside of the default Libraries folder. In addition, it requires the C++ Redistributable Package to be installed to work.
Main SLUtil.exe commands 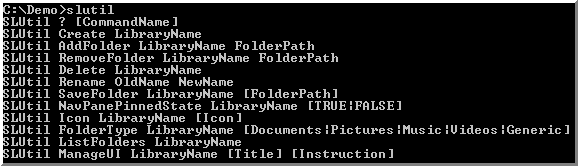
Create "Recipes" Library: slutil create Recipes
addfolder Recipes "C:DemoBaking Recipes"
Delete Folder from Library: slutil removefolder Recipes "C:DemoBaking Recipes"
Set Default Save Location: slutil savefolder Recipes "C:DemoPastry Recipes"
Delete Library: slutil delete Recipes
As you can see, the commands are much easier to figure out, it being both good and bad that you just specify the library name and it assumes you are working with the default Library folder in the user’s profile. If that’s all you want to do, and you already have installed or can deploy the C++ distributable, I recommend the Shell Libraries Utility. If you need to specify an alternative location for your libraries or don’t want to have to mess with runtime components, go with the Shell Library Command Line.
Final Thoughts
We at The Grim Admin hope this helps you customize libraries in your computing environment. One final warning I want to point out is you should make sure that your login scripts only run these utilities after checking that your operating system is Windows 7. Running these on an older version of Windows will pop up a shell32.dll error message. Feel free to use our sample batch file for detecting your current OS.
As always, feel free to post comments with your thoughts or suggestions! The downloads and other relevant links can be found below.
Links and Resources
- Download Shell Library Command Line & Shell Libraries Utilities
- Binaries: Click here to go to download page
- Microsoft Visual C++ 2010 Redistributable Package (for SLUtil.exe): x86 or x64
- Shell Library Command Line Source: http://msdn.microsoft.com/en-us/library/dd940379(VS.85).aspx
- Shell Libraries Utility Source (select native APIs version): http://channel9.msdn.com/learn/courses/Windows7/ShellLibraries/
- Windows7Library for PowerShell: If you want to play with a PowerShell version here’s the link
- Win7 Library Tool: While you can adjust all these settings with the command-line utilities, if you’re looking for a GUI to do any of the following this works well:
- Add network (UNC or mapped drive) and any other un-indexed folders to libraries.
- Backup library configuration, such that a saved set of libraries can be instantly restored at any point (like after a re-install of the OS or for transfer between multiple computers).
- Create a mirror of all libraries (using symbolic links) in [SystemDrive]:libraries. This means you can reference all your files using a much shorter path, and also provides another entry-point to your files in many places in the Operating System (e.g., file open/save dialogs).
- Change a library’s icon.
- Website: http://zornsoftware.talsit.info/?p=3
<
p>Source: Administratively Create and Modify Windows 7 Libraries
2 thoughts on “Administratively Create and Modify Windows 7 Libraries”
Libraries are confusing anda I cannot see what extra they bring to the table other than a layer of indirection between ‘Documents’ and ‘My Documents’. What is the difference and why is this cool?
stumbled upon this whilst wondering about the File->New options. Even via a junction, the libraries can’t be created… you have to be IN %appdata%\ms\win\libraries for ‘new Library’ option ….
will this ^^ allow for new file creation, via a custom-shortcut (to slutil or whatever it’s called)?